 TM
TM
Testing Ice Maker Optics Board
Testing the Ice Maker Optic Boards
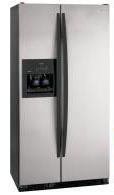
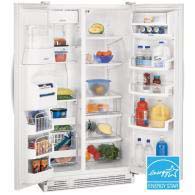
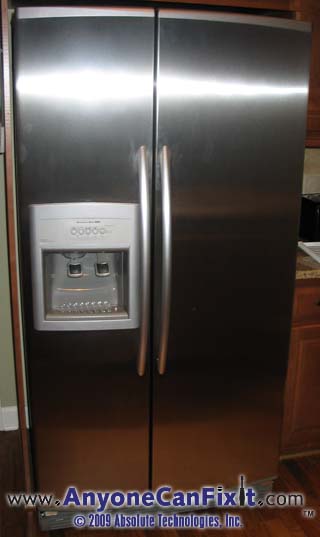
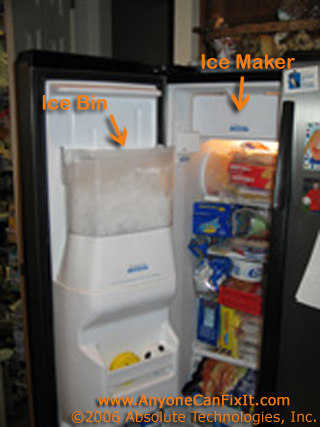
- There is a line of Whirlpool refrigerators that have a notorious problem in their ice makers. These refrigerators may be labeled as other brands (like Amana, Kenmore, KitchenAid, Galaxy, Inglis, MayTag, Roper, and Admiral), but basically, it’s the type of refrigerator with the ice bin on the door as shown in Figure 1 and 2 below.
Figure 1 - Typical Refrigerators with Problematic Icemakers
(Whirlpool and KitchenAid are some of the brands)
Figure 2 - Whirlpool Conquest Refrigerator with Ice Bin on the Door
The following procedure will help you determine if your optic boards need replacing.
The first thing you will need to determine is if your refrigerator was made prior to 2002 or if it was made 2002 or later. The reason is that there were two different types of optical boards used in these refrigerators. The optical boards function the same however, their diagnostic functions differ. There were boards made and installed in refrigerators in 2001 and earlier years, and then there are boards that were installed in 2002 and later.
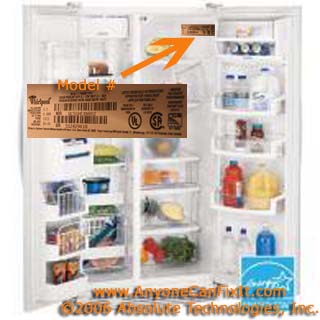
You should be able to find a year your refrigerator was made on the label just inside the door (towards the top on the right-hand side) as shown in Figure 3 below.
Figure 3 - Locating the Year ManufacturedYou should be able to find on that label a month and date that your refrigerator was manufactured. If you cannot find the manufactured year, no problem...another way to tell is if the infrared panel of your ice maker flashes a red light (LED), then you likely have the 2002 and later model of the optical boards.
There can be a possibility of a few different things that are typically wrong when these ice makers break...I cover all of these issues in the repair instructions...showing step by step, with detailed pictures how to fix each issue.
As these refrigerators get older, the optics boards are more likely to fail. There is an optic board test that should work on all models of this ice maker after 2002. If your refrigerator was made prior to 2002, there is a set of steps within the repair instructions to troubleshoot the ice maker on those models. It is pretty easy to check to see if the optic boards are working (and just as easy to fix the problem with these instructions and the proper parts).
The following procedure will help you determine if your ice maker has one of these common problems - a bad set of optical boards...
OPTICS TEST FOR 2001 and OLDER MODELS (2000, 1999,...)
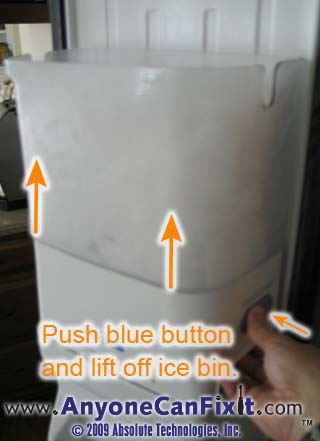
(for 2002 and newer models click here.)1. Open the freezer door and remove the ice bin from the door...hopefully you can just set this aside for a few minutes while we complete this quick test on the optic boards.
Figure 4 - Remove Ice BinFigure 4 shows how to push in the blue button so that you may lift the ice bin off of the door.
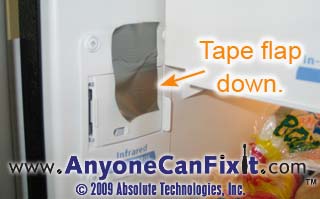
2. Use a piece of tape to hold down the flap of the ice maker infrared emitter (a sticky duct tape is good...something that will securely hold the flap down for a few seconds while the test is performed).
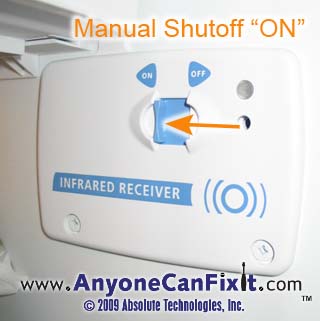
Figure 4 - Tape holding Flap Down3. Make sure the ice maker manual shutoff slide is in the "ON" position as shown in Figure 5 below.
Figure 5 - Manual Shutoff slide in the "ON" position4. Close the Freezer door for a minimum of 10 seconds.
Figure 6 - Activate Freezer Light Switch 3 Times5. Open the Freezer door for and activate the freezer door switch 3 times within 10 seconds (see Figure 6 above).
6. Close the freezer door within 20 seconds of step 5.
7. Wait a minimum of 5 seconds and a maximum of 50 seconds, then open the freezer door and observe the status light (LED) on the Infrared Receiver Panel.
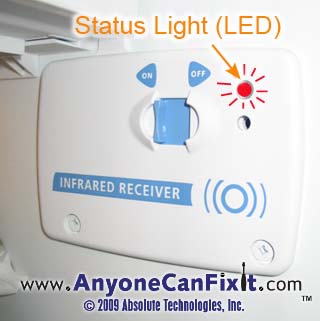
Figure 7 - Status Light (LED)Order the online repair instructions to determine if the optical boards are good or if you have another issue. The online instructions will show you what the status light (shown in Figure 7) is indicating (good optics, bad optics, etc.). The $19.99 cost of these repair instructions will save you the cost of having a service person which is typically +$80.
$19.99 for the Repair Instructions for the Ice Maker
(Guaranteed to help you easily fix your ice maker, with detailed step-by-step illustrated pictures, or your money back!)NOTE:
Your login and password will be immediately sent to the email address that is registered with your PayPal account. If this is not the proper email address you want the login and password sent to, please send a note with the proper email address, however, there will be a delay as the email will have to be manually processed. If you want to avoid any delay, make sure your PayPal email address is correct.MAKE SURE YOUR EMAIL IS CURRENT AND CORRECT IN PAYPAL TO AVOID DELAY ON DELIVERY OF YOUR LOGIN AND PASSWORD.
If you realize that it was not current when you confirmed your PayPal contribution, please send me an email (dharrison@AnyoneCanFixIt.com)
NOTE: Microsoft's Outlook Express is sometimes set not to allow viewing of attachments due to security issues (this may have been set automatically without your knowledge by Microsoft). If you are unable to read the attachment that is automatically sent to you once you donate via PayPal (or you do not see an email reply within 10 minutes), try this: In Outlook Express click Tools, Options, Security and uncheck the box by "Do not allow attachments to be saved or opened that could potentially be a virus". You may re-enable this once you have the chance to get your login and password from the email attachment that is sent.
If you have a yahoo.com email address, make sure to check your spam folder...seems like yahoo.com likes to stick my emails in there.
Or, if you don't use PayPal, then your payment can be sent to:Absolute Technologies, Inc.
Attention: Ice Maker Repair
PO Box 601
Holly Springs, NC 27540Please include your email address so that your access can be emailed to you.
Note, there is another test for the optics board to test another function of the optic boards. This other test is outlined in the instructions available for purchase. And if these other optic board tests pass, then you likely have the other common problem with your ice maker. See the description below at "Another issue with these ice makers involves replacing a part within the ice maker" (click here to go there)
The instructions for replacing the optic boards are a part of the ice maker repair instructions. In addition to the step by step pictures and details to change those boards, you will to need to get replacement optical boards. Within the instructions, I show you how you can get a set of boards with a 1 year warranty and a guarantee that if it doesn't fix your problem, you can return them for a full refund. The cost of these boards within these repair instructions are $79.99 (shipping in the US included). Outside of these instructions it would be hard to find these boards for less than $95 with shipping and they would likely have no warranty or guarantee (I show you other places to order these parts in the repair instructions so you realize that this $79.99 deal is much better than other options).
Other than the optical boards, the only other tools needed for this repair is a Philips screwdriver and a flat head screwdriver. It is a very easy and quick fix...if you can determine from the instructions above that your optical boards are bad, then you will have no problem replacing the optic boards with these repair instructions...even if you have done nothing like this before.
If you would like to get a set of optic boards, the cost would be $19.99 for the instructions plus $79.99 for the optic boards plus a $20.00 refundable deposit (this deposit is returned upon the return of your old optical boards). You can purchase using PayPal (which also accepts charge cards) below:
Or, if you do not need the instructions and just want to order the optical boards, you may do so here for $79.99 plus a $20 refundable deposit (which is refunded upon the return of your old optical boards):
Other than the optical boards, the only other tools needed for this repair is a Philips screwdriver and a flat head screwdriver. It is a very easy and quick fix...if you can determine from the instructions above that your optical boards are bad, then you will have no problem replacing the optic boards with these repair instructions...even if you have done nothing like this before.
OPTICS TEST FOR 2002 and NEWER MODELS (2003, 2004,...)
Make sure the freezer door has been shut for at least 1 minute prior to starting this test.
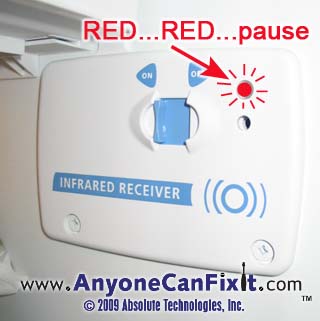
Figure 9 - Infrared Receiver PanelSimply open the freezer door and looking at the infrared receiver panel on the right side of the freezer (See Figure 9 above), with the Infrared Receiver switch in the ON position, you should see the red LED (light) flash on twice, then pause, then repeat again with two flashes, then pause...so
RED...RED...pause....RED...RED...pause...RED...RED...pause....
This flashing is normal and means things are okay so far...
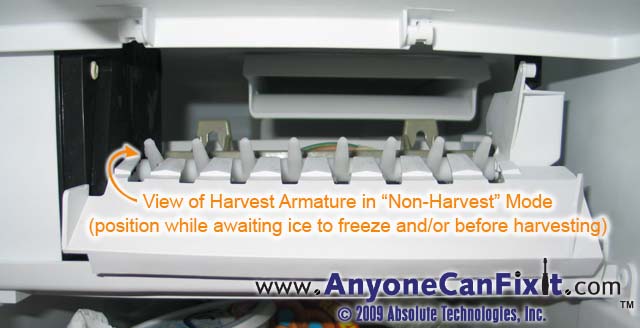
If it is not doing this...then you may be in the middle of a harvest mode by your ice maker (though, this is not likely if your ice maker is not working). Note the normal position for the ice maker armature to be in when NOT in harvest mode is shown in Figure 10 below.
Figure 10 - Non-Harvest Mode Armature PositionIf the ice maker is in "Harvest mode" (delivering ice out of the trays), there will be no red light until the cycle has finished. If this is the case, just close the freezer door and wait a few minutes until you hear the ice drop and the water tray finishing filling with water.
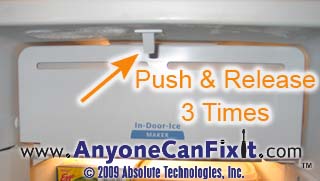
If you are not in the "Harvest Mode" (and you have observed the RED...RED...pause....RED...RED...pause...), then you will need to push in the flap on the left hand side of the freezer as shown in Figure 11 below.
Figure 11 - Infrared Transmitter Panel - Push in the FlapTo see what the results of the status LED indicate, purchase the online repair instructions and determine the status of the optical boards...if bad, the instructions are included that show how to swap out the optical boards.
$19.99 for the Repair Instructions for the Ice Maker
(Guaranteed to help you easily fix your ice maker, with detailed step-by-step illustrated pictures, or your money back!)NOTE:
Your login and password will be immediately sent to the email address that is registered with your PayPal account. If this is not the proper email address you want the login and password sent to, please send a note with the proper email address, however, there will be a delay as the email will have to be manually processed. If you want to avoid any delay, make sure your PayPal email address is correct.MAKE SURE YOUR EMAIL IS CURRENT AND CORRECT IN PAYPAL TO AVOID DELAY ON DELIVERY OF YOUR LOGIN AND PASSWORD.
If you realize that it was not current when you confirmed your PayPal contribution, please send me an email (dharrison@AnyoneCanFixIt.com)
NOTE: Microsoft's Outlook Express is sometimes set not to allow viewing of attachments due to security issues (this may have been set automatically without your knowledge by Microsoft). If you are unable to read the attachment that is automatically sent to you once you donate via PayPal (or you do not see an email reply within 10 minutes), try this: In Outlook Express click Tools, Options, Security and uncheck the box by "Do not allow attachments to be saved or opened that could potentially be a virus". You may re-enable this once you have the chance to get your login and password from the email attachment that is sent.
If you have a yahoo.com email address, make sure to check your spam folder...seems like yahoo.com likes to stick my emails in there.
Or, if you don't use PayPal, then your payment can be sent to:Absolute Technologies, Inc.
Attention: Ice Maker Repair
PO Box 601
Holly Springs, NC 27540Please include your email address so that your access can be emailed to you.
Note, that even if the above test passes, there is another test for the optics board to test another function of the optic boards. This other test is outlined in the instructions available for purchase. And if the other optic board test passes, then you likely have the other common problem with your ice maker...see the description below at "Another issue with these ice makers involves replacing a part within the ice maker" (click here to go there)
The instructions for replacing the optic boards are a part of the ice maker repair instructions. In addition to the step by step pictures and details to change those boards, you will to need to get replacement optical boards. Within the instructions, I show you how you can get a set of boards with a 1 year warranty and a guarantee that if it doesn't fix your problem, you can return them for a full refund. The cost of these boards within these repair instructions are $79.99 (shipping in the US included). Outside of these instructions it would be hard to find these boards for less than $95 with shipping and they would likely have no warranty or guarantee (I show you other places to order these parts in the repair instructions so you realize that this $79.99 deal is much better than other options).
If you would like to get a set of optic boards, the cost would be $19.99 for the instructions plus $79.99 for the optic boards plus a $20.00 refundable deposit (this deposit is returned upon the return of your old optical boards). You can purchase using PayPal (which also accepts charge cards) below:
PAYPAL: $119.98 = $19.99 Instructions + $79.99 Optic Boards + $20.00 Refundable Deposit
Or, if you do not need the instructions and just want to order the optical boards, you may do so here for $79.99 plus a $20 refundable deposit (which is refunded upon the return of your old optical boards):
Other than the optical boards, the only other tools needed for this repair is a Philips screwdriver and a flat head screwdriver. It is a very easy and quick fix...if you can determine from the instructions above that your optical boards are bad, then you will have no problem replacing the optic boards with these repair instructions...even if you have done nothing like this before.
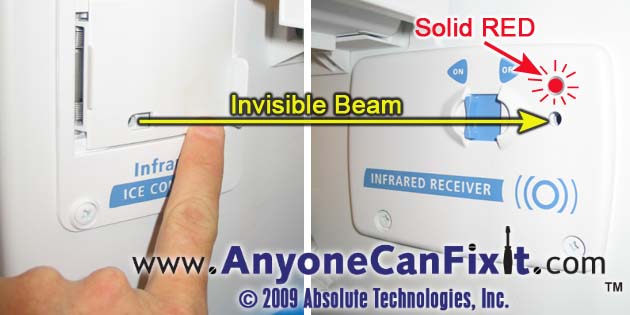
If your light remains solid RED when you push the flap in, then I have the other repair also available within these instructions. See the following write up on the other issue and repair....
ANOTHER ISSUE WITH THESE ICE MAKERS INVOLVES REPLACING A PART WITHIN THE ICE MAKER.
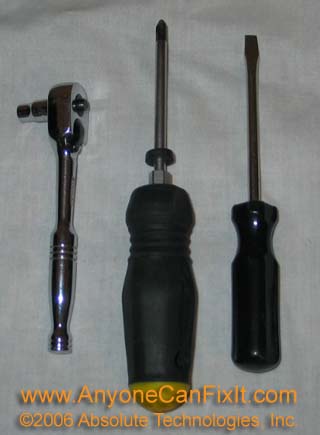
The only tools needed for this repair of your ice maker are as shown in Figure 4.
Figure 12 - Tools for Ice Maker RepairFrom left to right in Figure 12, the tools needed for the repair of your ice maker are a 1/4" socket (doesn't have to be like the one shown, but can be something like a nut driver), a phillips screwdriver, and while not necessary, you may find it helpful to have a screwdriver.
Depending upon your ice maker issue, you will most likely need to purchase a part. Within the instructions, I will show you how to order your part (based on your model number of your refrigerator). The part is typically about $70 (I show you how to get the part for $61.50 within the instructions). Keep this in mind as you figure your total cost to fix your refrigerator. You should be able to save yourself over $150 for the repair (and have the satisfaction of fixing it yourself). To repair this issue with the ice maker was quoted by our local Sears repair department to cost $230. You should be able to do it for under $90.
Time For Repair:
Mechanically Inclined - 15 minutes
First Timer - 45 minutes
This is a low challenge repair...anyone with the ability to use the tools shown in Figure 4 and with the instructions should be able to repair their ice maker.
Cost to do it yourself (if you already have the tools): About $81.49 ($61.50 for the part + $19.99 for the instructions).
Cost to Repair by Repairman: $230 as quoted by Sears Repair.Savings: $148.51
What People are Saying about this Repair:
Ice Maker Repair - What this web site is all about...Duane,
WOW!!! Just wanted to say thanks! Our ice-maker stopped working this past weekend and my family learned real quick how much we need ice!
So after surfing the internet about the problem, I ran across your repair instructions. And just like everyone else, I was hesitant to pay for repair instructions when I wasn't even sure of the problem. But after seeing my exact refrigerator on your site and reading your ad, I thought what the hek, I'll give it a try before I call the repair man. So on the way home from work, I stopped by a Sears Parts store and purchased the Module/Motor assembly for $77. I know this was a little more expensive than your site, but I didn't want to wait on shipping. Now I'm not much of a handyman and the tools you said I needed are pretty much the extent of my entire tool collection. But from start to finish, it took me about 25 minutes to complete the job! It would of been much quicker but I couldn't disconnect the dang wire harness! I thought I was going to break it or pull the wires out. But finally I got the wire harness to separate. That was the only small problem I encountered. The rest was cake. I did the repair right before bed so I didn't get to hear the first batch of ice drop, but it was great to wake up this morning and look in our fridge and find a full bucket of ice!! Just wanted to say thanks! Your clear and precise instructions really saved me some cash.
Thanks again!
Gib. - gilbert.m.perez@NOSPAMnasa.gov (remove NOSPAM for valid email address)
Save A Service Call and the cost...
My Kenmore side by side stopped making ice. I called the Sears Tech line and was only able to make an appointment for a repair visit, $74.00 just to show up, any work on the appliance or parts was extra. I searched the Internet at length for possible how-to repair sites and was fortunate to find yours. I purchased your on-line troubleshooting guide and used it to diagnose the problem. I ordered the repair part from your company and it arrived a short two or three days later. I installed the part and now I have ice. Thank you so much for your service. I only wish there were more out there like yours.
Jim McCarthy - jimmccarthy1338@NOSPAMsbcglobal.net (remove NOSPAM for valid email address)
When Someone Locally Ordered a part for their Ice Maker Repair...
Dear Mr. Harrison,
Thank you so much for your excellent customer service and website! I was so surprised and thankful that because we live in the same town you personally delivered the part to me! In this day of computers an online ordering that is a rare thing. In addition to your clear concise details regarding the repair. As I explained to you I had the ice maker out of my freezer in literally 5 minutes and taken apart in another 5. As soon as you delievered the part to me I had it exchanged and back in the freezer within 10 minutes. Within a few hours the first ice cube hit the catcher! Thank you very much!
What a great website and what excellent service! I would highly recommend your website to everyone. Thank you again.
Sincerely,
Timothy J. Finn - tfinnpa@NOSPAMgmail.com (remove NOSPAM for valid email address)
I personally delivered Tim's part order to him within 24 hours of him placing the order since he lived just minutes away from me. Tim was surprised to see the actual person responsible for this web site to be delivering his part. He had told me that his father-in-law in Virginia told him about the web site www.AnyoneCanFixIt.com and that one of his coworkers had used the site. Word of mouth is the best type of referral. ~Duane Harrison
Savings Calculated on the Ice Maker Repair...
Duane,
I received the motor assembly today and installed it quickly with no issues. I just heard the ice clunking a few minutes ago which was music to my ears. I was about to pay someone $275 to come and fix the ice maker.
Thank you very much for saving me $193.51.
Regards,
Osama Elsafadi - osama@NOSPAMsafadi.com (remove NOSPAM for valid email address)
Ice Maker Repair...
Duane,
Ordered the part from you and received it in timely fashion - thank you. Installed the part and had ice in no time. We can't thank you enough for your help, which came at a much more reasonable price than any service company.
Thanks again,
Todd & Kathy Savenko - tsavenko@NOSPAMinsight.rr.com (remove NOSPAM for valid email address)
Ice Maker Repair - Why wait? Do it yourself now...
Hi,
My ice maker had not been working for almost three months when we finally decided to call around. One guy seemed like he didn’t want the job (four weeks went by since I had called him), and we couldn’t afford a service call, part, and labor fees. Somehow I came across your site, and thought, well, there’s nothing to lose. So I took the ice maker apart this past Sunday night (I finally had time to mess with it), and ordered the part from a local appliance store. The hardest part about taking the ice maker apart was trying to separate the wiring harness! Anyway, I took apart the motor assembly, and sure enough, that white plastic gear was cracked. It only took the appliance store about a day to get the part in (the part was a little pricier than you quoted, about $90 w/ tax). The guy there told me that someone else had called that day about the same problem that I had! So I started reassembling everything about 9pm that night. It took about 20- 30 minutes to get everything put together and back in the freezer (I was on the phone while doing it). Just to make sure it worked, I emptied the ice bucket of the bag of ice we bought. With fingers crossed, I went to bed. When I left for work the next morning (6am), I took a peek in the freezer. I cannot tell you how happy I was- we had ice!!
I just want to thank you (as does my husband) for the information that you made available- the illustrations, the step-by-step instructions, even the likely problem and part number for it! Your “booklet” was very thorough and easy to follow. The entire repair was very easy to do, and took a minimal amount of time. I probably would’ve paid double by hiring someone to do this very simple repair! I just wish I had found your site three months ago!
Thanks again!
Selina Gonzales - SGonzales@NOSPAMCECCO.com
Note - If Selina could have waited for the delivery of the part (worst case, about 3 days via USPS first class), she could have saved another $30 by ordering the part from this web site, but sometimes you get so excited to get the job done, you just want to get the part and complete the job...either way, you're saving lots of money!
Another Satisfied Customer...
Received the motor assembly and installed. The ice maker is doing its 'clunking', what a great sound! Your instructions worked like a charm and you have another satisfied customer Duane. Thanks and have a good day!!
John Murphy - jrm59@NOSPAMhouston.rr.com
ICEMAKER REPAIR WORKED!
Duane,
I have to say I was a little skeptical about buying your icemaker repair guide, however when I saw the exact picture of my refrigerator on your website I said, "What the heck, its $20.00 and he is guaranteeing that it will work." I did have to end up replacing the module.... I just heard the first set ice cubes drop.... music to the ears.
Thanks for your help.
Jon - jonp0515@NOSPAMyahoo.com (remove NOSPAM for a valid email address)
Helping Fix Ice Makers in Canada too!
Thanks for the Ice Maker fix. I was one of the lucky 5% that did not have to get past Figure 1. The $23 CDN was well worth the saving difference from a $90 call out from the service guy. I'm sure future repairs will be necessary on this unit and now I have the complete fix required by the other 95% needing repairs.
Peter - peterdoucet@NOSPAMshaw.ca
Ice Maker Repair
Thanks for the help. I had a broken tab on the gear shaft and noticed it a week ago, but the gear was in place and so I felt it still should work. I went through the debug sheet found in the refrigerator grill 3 times and could not find a problem. I could not get it to work because I removed the gear early on and did not know what position it should be in. When I saw your fix, I went to a nearby (20 miles) parts supplier and bought the assembly. The parts man knew exactly what I was talking about when I said that all that was broke was a 20 cent plastic part. He sold me his standard lifetime guarantee for $7.00 and said he would likely see me again in 3 - 4 years.
Your website is great and easy for me to follow. I left you feedback.
Thanks
Texas_Ben
$19.99 for the Repair Instructions
for the Ice Maker
(Guaranteed to help you easily fix your ice maker, with detailed
step-by-step illustrated pictures, or your money back!)
NOTE:
Your login and password will be immediately sent to the email address that is
registered with your PayPal account. If this is not the proper email address
you want the login and password sent to, please send a note with the proper
email address, however, there will be a delay as the email will have to be
manually processed. If you want to avoid any delay, make sure your PayPal
email address is correct.
MAKE SURE YOUR EMAIL IS CURRENT AND CORRECT IN PAYPAL TO AVOID DELAY ON DELIVERY OF YOUR LOGIN AND PASSWORD.
If you realize that it was not current when you
confirmed your PayPal contribution, please send me an
email (dharrison@AnyoneCanFixIt.com)
If you have a yahoo.com email address, make sure to check your spam
folder...seems like yahoo.com likes to stick my emails in there.
Or, if you don't use PayPal,
then your payment can be sent to:
Absolute Technologies, Inc.
Attention:
Ice Maker Repair
PO Box 601
Holly Springs, NC 27540
Please include your email address so that your access can be emailed to you.
Link for Access for Ice Maker Repair
If you have already paid for your access, here is the link to access the repair instructions (you must have the username and password that was set up for you...you should have gotten this in an email upon receipt of payment):
www.anyonecanfixit.com/ice_maker/
Legal Disclaimer
AnyoneCanFixIt.com, a division of
Absolute Technologies, Inc. will not claim responsibility for information
posted within these web pages. While all efforts are made to provide
accurate information, the information is provided at your own risk - use it at
your own risk. We are not responsible for the misuse, incorrect installation,
incorrect information, or failure of any products we cover. NO WARRANTY IS
MADE OR IMPLIED REGARDING ANY PRODUCTS COVERED BY ANYONECANFIXIT.COM or
ABSOLUTE TECHNOLOGIES, INC. NOR DOES ANYONECANFIXIT.COM or ABSOLUTE
TECHNOLOGIES, INC. CLAIM TO PROTECT USERS FROM INJURY OR DEATH. THE USER
ASSUMES ALL RISKS.
The postings, comments, and opinions are provided at your own risk and do not
necessarily represent the views or opinions of AnyoneCanFixIt.com, a
division of Absolute Technologies, Inc. or any manufacturers or
companies listed on this website.
We cannot express how important it is to read the manufacturers instructions
that are included with every product you buy and use. Failure to do so could
result in incorrect use or installation, which could cause serious injury or
death. Any of these instructions may void or limit warranties provided
by the manufacturers. You assume all responsibilities by purchasing any
of the offered fixes.
ALL CONTENTS ON THIS SITE ARE PROTECTED BY COPYRIGHT. EXCEPT AS SPECIFICALLY PERMITTED HEREIN, NO PORTION OF THE INFORMATION ON THIS WEB SITE MAY BE REPRODUCED IN ANY FORM, OR BY ANY MEANS, WITHOUT PRIOR WRITTEN PERMISSION FROM ABSOLUTE TECHNOLOGIES, INC. VISITORS OR USERS ARE NOT PERMITTED TO MODIFY, DISTRIBUTE, PUBLISH, TRANSMIT OR CREATE DERIVATIVE WORKS OF ANY MATERIAL FOUND ON THIS WEB SITE FOR ANY PUBLIC OR COMMERCIAL PURPOSE.
©2009 Absolute Technologies, Inc.
